


January 09, 2018
User guide
Step-by-step,
Step 1: Double Check the icon name †ConfigAssist†which on the computer desktop.
Step2: Select †SDconnectâ€

Step3: Select †Configureâ€.

Step 4: Select the icon


Step5:

Step 6 and 7 :

Step 8 , 9 and 10.

Step 11: Successful to ActivationMB SD Connect C4C5MB Star Diagnostic Tools

If you
Posted by: mbbenzstar at
09:33 AM
| Comments (1)
| Add Comment
Post contains 86 words, total size 22 kb.
User guide
Step-by-step,
Step 1: Double Check the icon name †ConfigAssist†which on the computer desktop.
Step2: Select †SDconnectâ€
Step3: Select †Configureâ€.
Step 4: Select the icon
Step5:
Step 6 and 7 :
Step 8 , 9 and 10.
Step 11: Successful to ActivationMB SD Connect C4C5MB Star Diagnostic Tools
If you
Posted by: mbbenzstar at
09:33 AM
| No Comments
| Add Comment
Post contains 86 words, total size 22 kb.
January 05, 2018
Here is a
Kombiinstrument->DiagnosenachWerkangabe->Steuergerate-Anpassungen->
Steuergerate-Anpassungen (Variantencoderierung)->Variantkodierung Werkeinstellungen->
In the menu
enable this option
now you
If
you scroll a little more
you
Scroll
if you watch your
to do this
then choose Ansteuerungen->GesamstlisteallerAnsteuerungen->
Scroll
PressF3and confirm again withF3
Now you will see the "Kombiinstrument†reboots
Posted by: mbbenzstar at
07:09 AM
| Comments (1)
| Add Comment
Post contains 144 words, total size 12 kb.
January 03, 2018
For adding cruise control on vito viano w639
It is not my discovery, i find that on internet.
Add cruisecontrol / limiter to your Vito/Viano W639 it’s configuration.
This should work for all W639 till AJ08
InDAS Developer modetested version 10-200![]()
Used withSD connect C4multiplexer
In engine control unit:
Entwicklungen (Development data) ->F3
Password : flexecu ->F3
Steuergerate – Anpassungen (Control unit adaption) ->F3
Steuergerate-Anpassungen (Variantencoderierung) ->F3
VCD_Transporter->F3
a Pop-up tells you : "Mindest eine Codiereinstellung ist ungultig†confirm -> OK
Here you will find the option settings
write down the line that is blue.
For example : NSG or NAG_Klima_Wasserstandschalter
Now we search for the string that contains the same options + Tempomat and Begrenzer
So that will look like : NSG or NAG_Tempomat_v-Begrenzer_Klima_Wasserstandschalter
Once you find it , click it and confirm with ->F3
"Soll die Codierung in Steuergerat ubertragen werden ?â€->F3
JA or YES->F2 to proceed
Now we log out the engine ecu and go to the :
Instrument Cluster ( Kombi instrument) (Magnetti Marelli)
Steuergerate-Anpassungen (Variantencoderierung) ->F3
Variantencoderierung Algemeine Daten->F3
Scroll down untill you see "Limiter†set to Ja or Yes ->F3
F2 -> F1 -> F1
Ansteuerungen -> Gesamstliste aller Ansteuerungen ->
Scroll down untill you see the line : Steuergeraet Resetten (PowerON-Modus) (FN_Reset_SG_Power_ON)
Press F3 and confirm again with F3
Now you will see the "Kombiinstrument†reboots
Cruise control coding is added succesfully to your W639 now
Posted by: mbbenzstar at
03:46 AM
| No Comments
| Add Comment
Post contains 244 words, total size 7 kb.
December 11, 2017
Topic
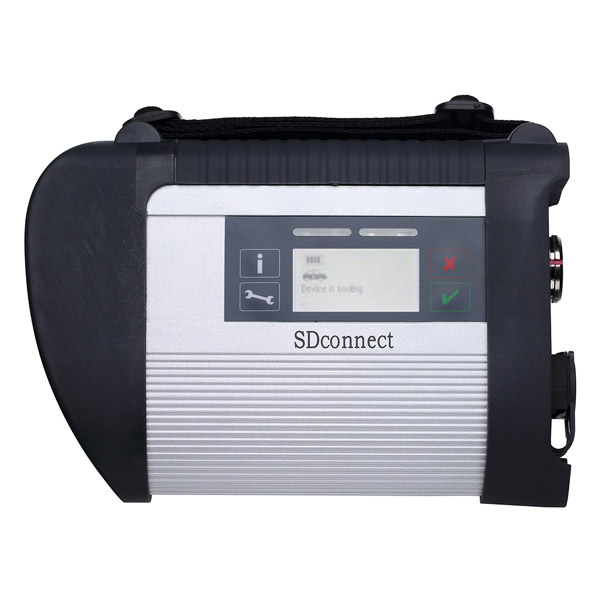
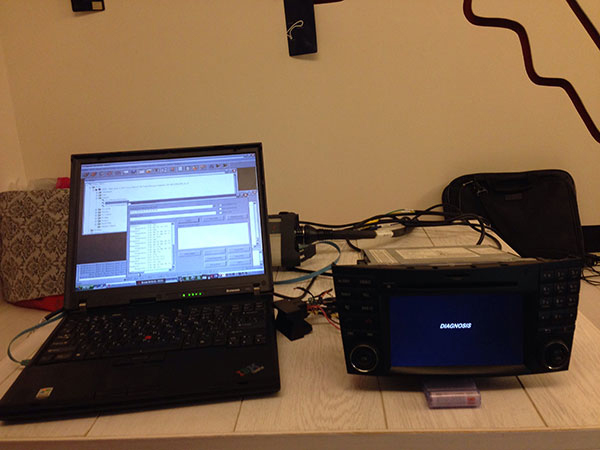
Tool option:SDconnect C4etc.
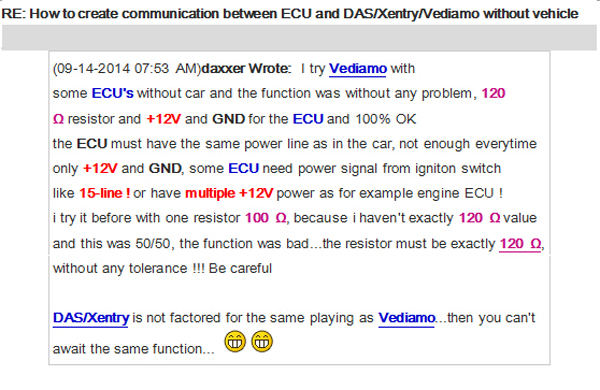
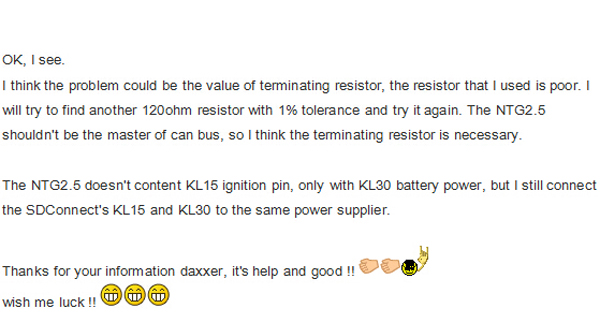
What you need to do is connect NTG2.5 with your SDConnect C4, you need to connect KL30/KL31/CAN-H/CAN-L, you don’t need to connect the ignition pin because NTG2.5 doesn’t have KL15.
And, you need to attach a 120ohm resistor as a terminal between CAN-H and CAN-L, it’s a request
Then, if your
If you want to
Manually trigger
Just press "Rev. Cam.†item like below image in the system setting page, the rear view camera will active if you power the camera up.

On a side note: KL31 bridge
KL 31 just means the Negative Battery Terminal / Ground (I am
So just connect Pin 15 (A-Block of the Quadlock Connector) to 12V+ (KL. 30) and Pin 12 to the Ground/Negative Terminal of your power supply (KL.31). And now press the ON Button and pray it works (which works always for me)
Source:
Posted by: mbbenzstar at
03:20 AM
| No Comments
| Add Comment
Post contains 246 words, total size 13 kb.
December 08, 2017
12.2017 XENTRY/DAS Windows 7or Windows 10:
Both OK.12.2017 XENTRY OpenShell XDOS is updated and tested successfully for use. Download link:
But I don't recommend windows 10 at all at least if you don't know how to manage it
try windows 7 and I
final note, you need a good version which should not be manipulated or pre-activated
- D-A-S / Xentry2017.12....Confirmed!
- Workshop Information System (WIS net)
2017.09.... Confirmed! - Electronic Parts Catalog (EPC.net) 2017.09....Confirmed!
- Part Location Finder (ST Finder)
2008/2016.... Confirmed! - STARUTILITIES ....Confirmed!
- SDMEDIA2014....Confirmed!
- Price List
PL712016.... Confirmed!


12.2017 XDOS Activation via Startkeycenter
This is thestartkeycenterI used to activate 12.2017 Xdos with old keys. Move the folder to C:>PROGRAM FILES(x86)>MERCEDES BENZ. Launchstartkeycenterfromfolder. Insert keys
![]() ROGRAMFILES
ROGRAMFILES
Source:
Posted by: mbbenzstar at
06:55 AM
| No Comments
| Add Comment
Post contains 172 words, total size 16 kb.
December 07, 2017
12.2017 XDOS Xentry user manual:Freedownload 12.2017Xentry Diagnostics Open Shell XDOSand then install, activate/configureswon Window 7, Windows 8, Windows 10 for Mercedes diagnostic and programming.
I am just sharing what bros in forums is supposed to be about. I’m not responsible for any bad use.
Free version:
Xentry Diagnostics Open Shell XDOS 12 2017-Torrent.rar (57KB)

No password required!
NewBomb :StartKey Center Deleted on System
New Activation System Started
OLD Key & New Key is working100%
This version need 2221-45&3.91Error Fix+ DAS Blacklist Fix + DAS License 0 Fix
Windows 7-8-10 x86 systemnot SUPPORTany more
NOT TESTED BY PROFESSIONALS!TRY ONYOUR OWN RISK!!
Tested version:
Xentry Diagnostics Open Shell 12.2017 Windows 7 Windows 10:

Tested & Confirmed to workperfectwithSDconnect C4&Xentry Connect C5
12.2017 XDOS installation:
You will not able to install this version on 32-bit system only 64-bit
In level 436 system go rolling back
Note: install x86 and x64 java,enablefirewalland installation will go through
Note: if your installation is not complete..just for a simple reason:
BoschVCIrequires an X64 processor!!
Update:windows32 bit and works well (soHHTWINcan still be used)


12.2017 XDOS Windows 32 bit fix

12.2017 XDOS Configuration: via Config Assist
Looks like they have moved to the "Config Assist†like the Tab 3 instead ofStartKeyCenter..

Should be pretty easy to mod for old keys, just need the magic makers to do their thing
Very likely that in the future they want to remove SDconnect, and they will go with the new Xentry VCI

12.2017XDOS Activation: via Startkeycenter
This is the Startkeycenter I used to activate 12.2017 Xdos with old keys. Move the folder to C:>PROGRAM FILES(x86)>MERCEDES BENZ. Launchstartkeycenterfromfolder. Insert keys forxentryonly. For DAS you should move the LIC.SLI file toC![]() ROGRAMFILES(x86)>MERCEDES BENZ>DAS>BIN which will activate it with no timeout. Blacklist isself explanatorywhich folders they should go in. I don’t claim any of this files……
ROGRAMFILES(x86)>MERCEDES BENZ>DAS>BIN which will activate it with no timeout. Blacklist isself explanatorywhich folders they should go in. I don’t claim any of this files……
Startkeycenter
DASTIMEOUT.rar
Mercedes-BenzBLACKLIST.rar
New & Old keys working 100%:
No problems activating withnewkeys,have a look at this:

Also No problemwitholdkeys.Xdos12.2017 installed and activated …Fully working….. I even did a transmission program andscncoding on a 221. For oldkeysall you need is a modifiedstartkeycenter folder. CopytoC:\Program Files (x86)\Mercedes-Benz. After keyinstallationyou can erase folder. Ofcourseyou will need 2221-45 and 3.91 error fix, Das timeout fix and blacklist.
2221-45&3.91Error Fix:
12.2017Xdos Car List:


New cars: 118, 167GLE, 177, 238, 247B, 257, 290, P470_1, Spr907, Spr910, Vit448, V-K448

Posted by: mbbenzstar at
02:32 AM
| No Comments
| Add Comment
Post contains 399 words, total size 49 kb.
November 27, 2017
[[I am copying this post from the one I made on MBworld as well, I figure both forums should see it, especially considering MrScott belongs to this one!]]This post assumes you have some knowledge of the software used. I’m not entirely comfortable making a full walk-through for beginners, as this is potentially risky.
After spending quite some time tinkering with and learning aboutDAS/Xentry/Vediamo, I believe I’ve almost completely solved my issues with throttle lag on my car. Since owning the car I’ve noticed that depending on how the car is driven, like through heavy traffic or on country roads, the throttle response tothegas pedaldoes not seem to stay consistent. For example, if I start off driving the car in stop and go traffic, the pedal seems to become "lazyâ€; next time I mash on the gas, there’s a very noticeable delay in throttle input and sometimes the car doesn’t shift down when it should, either in C or S mode. It was quite annoying, and on a few occasions, kind of risky. Aside from that there’d be a very noticeable difference in the way the car performed on a day to day basis, sometimes it felt sluggish, and other times it felt pretty quick. I really didn’t like how it was unpredictable.
This is discussed in athreads like this, and it appears that ECU adaptations are the cause for this. I’m sure the adaptations would be effective in some cases, but where I live and how I drive, the adaptation process seems to have a difficult time calibrating the throttle response, and the result has been pretty undesirable to me. It seems others have the same issue, and have tried solving it doing the simple TCU reset. This reset does work, very temporarily. Every time I tried it, it’d help for a few drives but then it’d revert to sluggishness. I went over 10,000km after pulling thecar batteryand doing the TCU reset to see if the car needed a long time to "learnâ€, and it did improve, but the inconsistency/unpredictability of the throttle input, and delay, still remained an issue.
I’m very glad to have spent the money getting a diagnostic multiplexer, as it’s allowed me to learn quite a lot about how these cars operate. On top of that, I’ve done a bunch of tweaking to get things to how I’d like. If you have access to one, or know someone who does, the following tweaks have solved these problems for me. This could likely be accomplished inXentryrather thanVediamo, but I was unable to get access to the necessary settings throughXentrymyself. I Please note, I have no idea the effect this will have on warranty, as my car is completely out of any warranty..
MrScott52, a very helpful member of Benzworld posted a youtube guide on how to enable a few parameters to increase responsiveness of a diesel variant in an earlier version of DAS; these tweaks seem to make a difference with my 2.5L V6 M272 w204 as well. (I’ll link the video in a following reply.)
Attached below are the necessary parameter changes for the ME 9.7 ECU in Vediamo, which solved my issues with throttle delay (many listed in MrScott52’s video), and here are the descriptions of each:
#1 (Lastschlagdaempfung)This is the most important one. This parameter seems to be the main culprit for the inconsistent feeling throttle response and sluggishness, and I believe it causes the wonkythrottle bodyadaptations which I find so awful. Disabling it has removed most, if not all delay in throttle input. It is referred to as "load-reversal damping†inVediamo(german), but it is the "Throttle Change Damping†parameter inXentry. I changed this parameter about a month after the others, and it definitely had the most significant impact on throttle response, and now the throttle is very consistent in performance. I believe this parameter is more directly related to the actualthrottle bodythan thegas pedal, unlike the next parameter.
#2 (Pedalkennlinie) This is the pedal curve parameter. My car had KLD4 as default. You can play with this, and possibly leave it at KLD4. However, I changed it toKLD2. From what I understand,KLD2is meant for cars with a manual transmission, and as such, I’d expect the pedal curve to be the most "natural†feeling to the driver. In contrast, I believe KLD4 is more responsive, but "jumpier†(more erratic in terms of throttle input). Combining KLD4 with disabling the throttle change damping parametermaybe undesirable in terms of comfort/consistency.
#3(Momentenbegrenzung) This is the torque limit parameter. The main effect I’ve observed from disabling this is that the car doesn’t reduce throttle/torque as much while cornering anymore, and the car seems to accelerate slightly faster from a standstill than before. May not be necessary to fix throttle delay, but I find it favourable.
#4(Momentenerhoehung Getriebe) This parameter is supplementary to#3.Like MrScott describes in his video, it allows the engine ECU to monitor torque output and send it to the transmission, but keeps it within safe/comfortable limits. I find this parameter to improve gear shifts very slightly; torque input and acceleration remains very steady throughout gear shifts. I believe it very slightly improves acceleration, even compared to only having the torque limiter disabled.Do not change this to the GSG setting.Doing so resulted in some very uncomfortable shifting. I’m not sure if there’d be a long term effect on the gearbox here, so just don’t as a precaution. The option highlighted in black is the default setting – the ECU is not allowed to increase torque to the gearbox depending on measurement.
With all these parameters changed, I have my car performing the way I’d like it to. It’s performance remains far more consistent, there’ssignificantlyless throttle lag, and it does actually accelerate faster (I’ve measured), but only very slightly. Starting off in C mode on an incline also no longer feels like as much of a strain. Now, all of this being said, if you have the tools and such to do this yourself, or know someone who can,you do so at your own risk. I’ve driven over 10,000km already without any negative effects of this, but I just don’t want to be responsible if anything goes wrong. I can’t imagine anything would, though. If you are willing to do this yourself, please be aware thatthere are many ecu parameters that are difficult to understand, and modifying them at all could potentially cause irreversible damage.I do not recommend making adjustments to any other unknown parameters without thoroughly researching their function and/or purpose.
p.s the screenshots were taken in simulation mode, I didn’t think to screenshot anything while I was actually connected to my car. The highlighted values are still of course relevant.
Attached Images
1 Throttle Damping.jpg
2 Pedal Curve.jpg

3 Torque Limiter.jpg

4 Torque Increase Allowance.jpg

Posted by: mbbenzstar at
03:43 AM
| No Comments
| Add Comment
Post contains 1115 words, total size 21 kb.
November 23, 2017
2017 Xentry Connect C5 user manual: how to configure/set up SDconnect C5 to use for the first time

Please have your XENTRY ConnectMAC addresses (Wi-fi and LAN) enabled for the workshop networkbyyourIT supervisor/IT service provider in advance. You can read off theMAC addresses (Wi-fi and LAN) from the stickers on the devices.

Your case already contains a printed empty network questionnaire.
Please have it filled out by your IT supervisor. Important! Donotcontinuethe initial startup until the questionnaire has been filledoutcompletely! This will help to avoid additional work.

The latest Mercedes diagnostic software 09.2017diskcame with your Xentry Connect C5.
You can start the network configuration now.
Completely charge and turn on the XENTRY Connect.
Starting the XENTRY Connect for the first time can take up to 10 minutes.
Configuration can be started whilst both devices are still charging.
Attention! Be sure to use the correct power supply units!
Start the XENTRY Control software using the desktop link on the laptop. ConfigAssist is
Note! If you work with static IP addresses, you must performtheconfigurationvia the expert dialog and transfer the configurationtotheXENTRY Connect via a USB stick.

Please have the filled out network questionnaire on hand:
How would you like to configure the devices?
Select one of the 3 options.
Recommended selection: "New without existing configuration dataâ€.

Please continue following the ConfigAssist dialogs and enter the required
data from the network questionnaire.
Next, switch on the XENTRY Connect. This has already finished installing.

In the final steps, the configuration is transferred from the laptop to the XENTRY Connect. You will be prompted tointerconnectthedevices using the supplied black Ethernet connectingcable.
This cable connection is required only for configuration
Ifconfigurationis successful, a green tile with the number of the XENTRYConnect C5willbedisplayed. You can now use the devices: RemovetheblackEthernet connecting cable to work via WLAN and with anonlineconnection. Then click on the green tile in order to read out thedataforordering the StartKey.

Done!
Source:
Posted by: mbbenzstar at
05:56 AM
| No Comments
| Add Comment
Post contains 332 words, total size 16 kb.
November 22, 2017
First

Fakembstar c5 is another SDconnect c4 with a different look only
fake C5 adopts the same design in appearance as the genuine from French ACTIA Company
See the fake board from c5 mux, completely same as sdconnecc5


To buy a fake c5 is to have a c4 in hand.
But now, you have luck with a
Genuine Xentry Connect C5

1:1 clone of the original

This 1:1 clone of the original is the newest star diagnosis system in the year 2017.
Same as the one produced by French ACTIA Company, can test Engine /
New & Update:
1 This C5 is the real version withHQ PCB like the original, not the
2 support
3 has an Ethernet switch, which switches the TCP/IP messages in the event
|
Electrical Interface |
SD Connect C4 |
Xentry Connect C5 |
|
K-LINE |
yes |
yes |
|
CAN |
yes |
yes |
|
DOIP |
no |
yes |
New


What the difference between C5 and
1.OS: Windows Embedded Standard 7(32bit)
2.Processor: ArrandaieCeleron P4500oderP4505(38W TDP)
3.Memory: 4G hard disk with 256GB SSD
4.Display: 128*64 PX
5.Battery: 40 minutes (When CPU capacity to 60%)
6.Weight: 1.9KG
7.Network connection: WLAN : IEEE802.11 a/b/g/n2.4+5GHZ
The way to connect: support wireless connection via 1000M workshop switches, also
The management software can be installed on any computer with Windows 7 - 32-bit or Windows 8 - 32-bit and serves only for communication with the multiplexer
The licensing system is reworked - now licenses are stored on MB servers - Any license changes are tracked by the multiplexer when connected to the Internet network.
Why you should
After 2015, all Star Diagnosis equipment is no longer supported. First of all, this means that there is no update of the diagnostic data for the newest cars and their systems, as well as the lack of the possibility of coding and programming of electronic units due to the backlog of the software data level in the device, from data in the electronic control units of the car.
Already at the end of 2014, at most dealerships, almost all of the previously used Star Diagnosis Compact4 with SDConnect DoIP multiplexers were almost completely removed. Instead, dealers received Xentry Kit kits, which include the latest Xentry Connect multiplexers and Xentry Tab tablets from Panasonic. Tablets are custom-made, although they also have a "civilian" version - the Panasonic Toughbook CF-D1, somewhat inferior in terms of battery life to the original Xentry
Honestly, the need to use the Xentry Tab on non-dealer services seems somewhat exaggerated to me. With dealers everything is clear - they were forced to use this equipment.
What about original Xentry connect c5 price?
Undoubtedly, the original c5 with Panasonic tablet from the ACTIA Company is excellent ... But ... Its price is disheartening. The cost of the Japanese tablet is realistic to buy pieces of eight new laptops or tablets from other manufacturers.
So , recommend buying an original Xentry connect and 1:1 clone:http://www.mbstartool.com/wholesale/mb-sd-
After all, in
Thus, with this equipment, you do not lag behind the progress. You use in your work the best that is available today. Each your client, seeing with his own eyes that you in your work use the same device that he saw at the dealer's service station, will understand that he made the right decision entrusting his car to your specialists.
Xentry
Yes, attach the test photos


 Source:
http://www.mbstartool.com/service/what-different-between-
Posted by: mbbenzstar at
07:32 AM
| No Comments
| Add Comment
Post contains 749 words, total size 43 kb.
November 17, 2017
Topic:How to configure SD connect C4 LAN & WiFi to solve DAS fault (1.1)-1.501.9500.
Tool:aclone SD Connect C4
Software:2011/3 Xentry
Status:I’ve started up SDNC to see if the connection is okay, and it turns green when I connect the multiplexer via LAN, but when I try the wifi it stays red. It can also read out some data from the multiplexer so I am assuming thethe multiplexeris working fine too
Error:If I connect it to a car, DAS keeps popping up the (1.1)-1.501.9500 error (as I understand that must be some kind of communication problem). The car’s wiring is fine as KTS 520 can communicate with it.
Photos:
Seetheceasertest post results


SDConnect toolkit says that my mux is available, but when I click on the button in the middle I get an error message, with an error code 750. That button is supposed to be for searching for multiplexers. This kind of gives me the impression that something isn’t quite working right :S
In the toolkit admin, it displays a serial number, says the mux is available. See in the attachments.


Solution:
It’s working!!! (At least it’s working via LAN, have not tried WLAN yet.)
I can’t believe it :O
Changedvalue in cal.ini to PART_W (to be exact, didn’t need to change it, it was PART_W, just left it that way ![]() ).
).
As for the rest of the instructions, I haven’t been able to follow them exactly. I also got a vid with instructions and it’s a little bit different (I’ll post it here if anyone needs though). Forexamplethe LAN IP address is 172.29.127.112, but it seems to be working that way.AlsoI haven’t been able to configure the "roadWLANâ€,because it doesn’t matter what I enter into the "key†field, it keeps saying that the key cannot be divided by 2 and therefore it is not hexadecimal
Hope this isn’t going to hinder my chances of using WLAN…
But I’m going to find out in a few anyway.
EDIT: Also tried with LAN IP: 172.29.127.119, it doesn’t make a difference. SDConnect works with both IP-s.
Damn….I clicked on the "Delivery condition†button in the SDconnect toolkit, and now I cannot turn on the WLAN on SDconnect. I think it wrote something into the MUX’s software :S
The LAN connection still works though, so the MUX is not blocked yet luckily….
Look here:SD Connect Compact 4LAN & WIFI configuration
SD connect C4 LAN configuration


SD connect C4 WIFI configuration


Source:
Posted by: mbbenzstar at
09:05 AM
| No Comments
| Add Comment
Post contains 423 words, total size 48 kb.
November 16, 2017
Problem:
Hello MB star
I just recieved My tablet and it looks and work Very good .
But The sd connect interface is Saying "please put in batteriesâ€
What type of batteries is it ?
Solution:
This problem same to :
SD connect compact 4 mux display: Favor inserir baterias(Please insert batteries)

Here you go :
Please prepare the following tools:

①— SDconnect multiplexer which need to input the batteries。
②— 6 units Ni-MH Rechargeable batteries,Size:AA, Voltage:1.2V, Capacity:above 1700mA。
③— 1 unit 108M WIFI Card。
④— Plum screwdriver,Specification:T-20
Take out the rubber:
2.1 Use the T20 Plum screwdriver to take out the screws as below.

2.2 Take out the rubber as below.

①— Batteries Space.
②— WIFI Card Space.
③— SD Card Space.
Insert the Rechargeable batteries.
3.1 Use the T20 Plum screwdriver to take out the screws of Batteries Space fixation as below.

3.2 Take out the fixation of Batteries Space. Pay attention to the Battery polarity marked in the Batteries Space.

3.3 Insert the batteries. Note the Battery polarity.

3.4 Button on the Fixation of Batteries Space after inputting the Rechargeable batteries.

3.5 Use the T20 Plum screwdriver to fix the screws of Batteries Space fixation as below. Inserting the batteries is finished.

Installing WIFI Card.
4.1 Inserting the WIFI Card into the WIFI Card Space. Please make the correct direction.

4.2 Push it to make it totally connected.

4.3 Cover the rubber and fix the screws to finish all the work.

Note 1:
Go to the info section within DAS Xentry— search SDconnect and you will find what all the SDconnect symbols defined!!

Note 2:
pls check these picture, you can choose self-diagnosis your SD connect c4


Source:
Posted by: mbbenzstar at
03:03 AM
| No Comments
| Add Comment
Post contains 291 words, total size 15 kb.
November 14, 2017
Free download theFIXenables the access to diagnosis of vehicle typesW204 (C, GLK Class), W207, W212 (E Class)viaDAS
Password: xdos_das_reem_fix1117
32bit Windows only, not 64bit
Note:
to have the tested Xentry/DAS, used with relief


Posted by: mbbenzstar at
06:24 AM
| No Comments
| Add Comment
Post contains 69 words, total size 9 kb.
November 06, 2017
If you have
Photos oferrormessage:
DAS CAL 830 ERROR 1

DAS CAL 830 ERROR 2

DAS CAL 830 ERROR 3


Please help to resolve
Reply:
DAS CAL830 error is because this new DAS was never intended to be used with an old Part
To solve DAS CAL830 error:
Change bin file
Before
Maybe you already haveMixedbin
Source:
Posted by: mbbenzstar at
08:48 AM
| No Comments
| Add Comment
Post contains 106 words, total size 21 kb.
November 02, 2017
hi
can be configured
thank you very much in advance
Reply: Try here:http://www.mbstartool.com/wholesale/v201605-
XENTRY Diagnostics OpenShell 2016.05 for C3
100% working and
– Easy to activate by yourself, with the help
– 256GB SSD for Dell D630, not HDD
|
MB STAR C3 SSD VS Common HDD in Terms of Running Speed |
|||
|
D630 with 4GB RAM |
Time to boot |
Time to shutdown |
Time to
|
|
SSD |
About 90 seconds |
About 20 Seconds |
About 145 seconds |
|
Common HDD |
About 240 Seconds |
About 50 Seconds |
About 207 Seconds |
|
D630 laptop with 1GB |
|||
|
SSD |
About 195 seconds |
About 22 Seconds |
About 248 Seconds |
|
Common HDD |
About 300 Seconds |
About 120 Seconds |
About 307 Seconds |
– Xentry.OpenShell.XDOS 2016.05
– WIS 2016.03 EWANet
– EPC 2016.03 EWANet
– EPC Mercedes Pricelist 2017.06 integrated
– SD SDmedia 2014.01
– Starfinder v2008 fixed, with HTTP server
– Mercedes Pricelist 70
– A lot of fixes to improve core system performance
– Some useful tools
– Special security system for your star c3– Professional support @mbstartool.comof course


Source:
Posted by: mbbenzstar at
08:54 AM
| Comments (1)
| Add Comment
Post contains 208 words, total size 34 kb.
October 25, 2017
2005 E55 AMG
-Straightened steering wheel by adjusting tie-rod ends (was offset to 1:30 o’clock). Set front toe to 0.5mm toe-in each side using string measurement.
-Calibrated suspension
-Before: ** = "Axle Inclination†(rear) or "Control Arm Inclination†(front) Left Rear Right Rear Left Front Right Front Camber -2.3 -2.3 -1.3 -1.2 Height 25 3/8†25 3/8†26 ½†25 5/8†** -2.8 -2.8 +2.6 +2.4
-After: ** = "Axle Inclination†(rear) or "Control Arm Inclination†(front) Left Rear Right Rear Left Front Right Front Camber -1.6 -1.7 -1.1 -1.2 Height 26 3/4†27†26 ¼†26 ½†** -1.2 -1.2 +3.1 +3.1 Note: Rear inclination measured directly off of drive axles; front inclination measured off of "nubs†on lower control arms. Confirmed voltage values
A brief overview of calibrating the suspension on my W211 using an inclinometer app on


As you can see, Xentry DAS calibrate Airmatic Suspension on W211 successfully.
Source:
Posted by: mbbenzstar at
09:26 AM
| No Comments
| Add Comment
Post contains 514 words, total size 17 kb.
October 23, 2017
Topic: WIS from DAS not run
I installedWISStandanlone07/16 on XDOS 09/16.
WIS works good from desktop and from Xentry, but

Reply:
WIS Standalone works just perfect
But there is one condition for the system that lots of
Some years ago Daimler start to link WIS documents through Xentry system properties!
This way all documents will be shown only
Forget DAS
Another good tip: WISnot
Insert this folder (WIS_LINK) in
F:\Programm\DAS\Trees\PKW\Programm and
F:\Programm\DAS\Trees\Global\Programm
Before you make it rename the original folder.
And goto SDNC-
mark Offline (WIS Standalone)
I hope it will help.
Source:
Posted by: mbbenzstar at
02:34 AM
| No Comments
| Add Comment
Post contains 152 words, total size 13 kb.
October 18, 2017
What isvariant coding? And how to do on Mercedes S55 ESP?
Purpose:ESP module variant coding withStar diagnostic
Vehicle:2002 Mercedes w220 s55
Problem:I get a code under ESP module saying C1511-005 Coding Error Variant Coding is incorrect
Reply:
The variant coding in question is set by using factory data. That factory data is basically what chassis that engine control unit is bolted to. Things likeweightof the car, yawsensorand acceleration sensor parameters, moment arms, etc etc.
Once the engine control unit "learns†its variant coding, it is permanently and irrevocably locked down.
The ESP module reads the variant coding from the ECU. Once read, its †soft†locked.
Your trouble code suggests that the ESP module has a variant coding that differs from that of the ECU.
Is this a recent occurrence? Did you perhaps havean thirdparty ECU tune performed? Was the ESP modulereplaced ?Is the trouble code stored orcurrent ?
Using STAR you can go into the ESP and check the currency of the error code and determine if it was 9 years ago or last Tuesday. If it was a long ago and a stored code, I would clear it and move on. If it is current, you can force a variant locking reset of the ESP module in STAR diagnostic and see if the code returns. If the trouble code returns, that would make it a current and ongoing error. If that turns out to be the case then perhaps the ESP module has gone "breasts skywardâ€.
Look here:
in STAR diagnostic
go to theESP moduleunder CONTROL UNITS
CHASSIS
ESP
Fault Codes
Select C1511-005
1. to the right it should say CURRENT or STORED
hit F8
It should show you how many time the car hasbenstarted after the code was detected. "0†means the fault is CURRENT, any number greater than 0 the fault should be STORED and past history. The ( obviously ) higher the number of start cycles the longer ago it was.
2. Double click C1511-005
Read thepre conditions
hit F3
read the sequence and follow it to (hopefully) force a variant coding re-read/write.
It would seem that the ESP reads the ECU on everystart up. Having a bad TCUMAYbe contributing to the ECU variant coding being off kilter. I would think there would be some P2000-P2564 series codes displayed for that though.
The most important note:When you get into adaptation it shows 000000 zeros on thevinnumber section and ask you to entervinto match it. tried but no success.
How to solve:
Bear in mind I am using Xentry-Sim.
Paramaeters: specified US D2B version 220.175
Control Units
Drive
Transmission: selected 722.6 as of 2001
Control Unit Adaptations
Firststab in the dark, try F7 ( Perform Synchronization ) In other words.. †go fetch me the VIN from the ECU â€
If that is successful ( something other than 0’sdisplayed) ,then F5 ( confirmation of the VIN ).
If not successful, try entering VIN as it appears normally, then F5
If that doesn’t work try entering as internal FIN, 2201751Axxxxxx wherexxxxxxis your chassis serial from Normal VIN. Then F5.
If none of that works…Itmaybetimefor some of that professional help mentioned earlier up the thread.
Try that and see what happens
I have no training asa MBmech/tech and offer this as just a possible direction to proceed in. The ( very ) highly paid professionals at theDollarshipor the ( not so ) highly paid folks at a good independent shop should/would have the final say.
Source:
Posted by: mbbenzstar at
09:10 AM
| No Comments
| Add Comment
Post contains 585 words, total size 20 kb.
October 17, 2017
Q:I haveproblemwithXentry Sim11.2011, when itlaunchSim DAS -> No language defined!
How to fixit ?
A:Place DAS SIM and DAS Shortcuts ondesktop:
DAS shortcut target as: F:\Programme\DAS\bin\DAS32R2.exe -len
And for DAS SIM Target as: F:\Programme\DAS\bin\simdas.exe -*CALsimu -*ctxtsim.sli-*nolog-*len
Q:do you have DAS32R2.exe for 11.2011. I launch ORG DAS32R2.exe say Star DAS via Xentry
A:you can usexentrysim
no worries
starting 05 2011 das execute underxentry
if u insist to use das standalone, then use 01 2011 or 2010 version asPatriansaid.
why you shouldlookingfor difficult ways
therearesome reason why missdaimlerdevelopedxentryand merge Das inside it.
best wishes
Q:I want to useSimDAS
OfcourseI launch Xentry Sim first but when I choose C Class (203). SimDas is executed but " No language defined! " and not run
A:It seems that the installation not goingperfect.
you mustpassedall the installation ways to finish button.
And the nature junction f
when you have a good installations steps.
no need to use any junction method. :tdown:
the folderUserdatain F:\ will be seen as a book folder, a little different than C:\.
take a notice on that asPatriansaid above.
anywaywish u a good
there you go ... M8 ....
Posted by: mbbenzstar at
03:37 AM
| No Comments
| Add Comment
Post contains 204 words, total size 3 kb.
34 queries taking 0.0579 seconds, 126 records returned.
Powered by Minx 1.1.6c-pink.

